Motorized Bike Clutch Repair

Motorized Bicycle Clutch Assembly & Repair

How to resolve bicycle motor clutch problems

Bicycle motor with expansion chamber

Fixing problems on motorized bicycle engines

Check the latest Parts, Gas conversion kits and e-bike prices on Bikeberry - Power-bicycle is reader supported. When you buy through links on our site, we may earn an affiliate commission.

The most common bicycle motor clutch problems are

  • Incorrect setup or installation.  – 65%
  • lost ball bearing (the ball that sits behind the clutch pin).  – 25%
  • stripped threads on the star nut.  – 5%
  • a variety of other rare faults, including worn clutch pads.  – 5%

Our experience has shown us that motorized bicycle clutches are often set up incorrectly by the manufacturer.  We find many clutches that do not work correctly, or do not disengage, or engage, properly. 

Problems with the parts of 80cc bike motor clutches are rare, however, factory adjustment can be poor and incorrect installation and losing the ball behind the clutch pin are commonplace.

These notes clarify the setup, adjustment, and operation of motorized bicycle clutch assemblies. 

BB Motorized Bicycle Superstore

Bicycle Engine Clutch Assembly

How the clutch works

Engagement:

The heavy spring on the Jack Shaft presses the clutch pressure plate against the clutch plate through a ‘pull-rod’ arrangement fitted inside the Jack Shaft. The load is transmitted by the star nut to the clutch plate.

Disengagement:

As the clutch lever on the handlebars is pulled in, the cable tightens and pulls the actuation lever on top of the chain cover casing of the bicycle motor.


As the actuator level is pulled, the shaft on the lever twists and the flat face at bottom of the shaft turns.  As the shaft on the actuator arm turns, it pushes the clutch pin about 1 – 1.5 mm toward the centre of the clutch housing.


The clutch pushrod, and ball bearing, push against the heavy spring of the Jack Shaft which releases the pressure on the clutch plate. The clutch plate then lifts up from the clutch pads and the clutch is disengaged.  (Note that the clutch pushrod on motorized bicycles is often referred to as the clutch pin or the bucking bar) 


When the engine is running, the large gear housing the clutch pads is still rotating even when the clutch lever is pulled in.


A bearing assembly in the clutch plate & large gear assembly allows the clutch plate & large gear to turn (driven by the motor) while the clutch pressure plate and Jack Shaft remains stationary. 

BB Bike Parts

Setting up the clutch on motorized bicycle engines

To set up the clutch operation, there are three main areas to be dealt with: 

  1. Clutch engagement pressure 
  2. Actuation lever and housing clearance to bucking bar 
  3. Control lever action, latch operation, and cable tension 

Each of these areas affects the overall performance, and life, of the clutch. 

Setting up a new clutch assembly on an 80cc bicycle motor

1. Setting up clutch engagement pressure

Note: It is assumed that the motor is installed on a bike and the clutch control lever, and 

cable, have been fitted. If not you will need to adjust your actions accordingly. 

a)  Remove the five screws retaining the clutch side cover and remove the cover 

b)  Remove the lock screw from the clutch pressure plate (next to the star nut).

c)  Use the clutch lever on the handlebars to disengage the clutch (pull the lever and latch the lock button) 

d)  Undo the star nut until it is held by two or three threads 

e)  Release the clutch lever.

f) Press the clutch pressure plate against the clutch plate and tighten the star nut until it just holds the clutch pressure plate against the clutch plate

g)  Pull the clutch lever and turn the star nut clockwise a further one-half turn plus one notch. Make small adjustments to clear the lock screw hole, and re-install the lock screw.

Note: Use nail polish to hold the screw in place. It must sit firmly on the surface of the clutch pressure plate. The star nut needs to be free to move in and out but locked in position so it doesn’t turn.


h)  Release the control lever and test the clutch pressure: Turn the rear wheel and check that it can push against the compression of the motor without slipping. 


i)  If the clutch slips, tighten the star nut one more notch and test it again. If the clutch still slips 

then you will need to clean the clutch Assembly (see “Cleaning the Pressure Plate and 

clutch Pads” near the end of these notes). 


Note: You may find the control lever action feels wrong. Do not change anything; we deal with this at a later stage. Also, add some general purpose grease in the area where the gears mesh. 

BB Beach Cruiser

2. Setting the actuation lever, the housing, and the clutch pin and ball

Between them, the actuation lever, the chain drive cover, and the clutch pin and ball, control the engagement and disengagement of the clutch assembly. If they are not set up correctly the clutch, will either drag when disengaged, slip when engaged or create severe loads on the clutch cable. Poor setup will cause heavy lever action and can lead to cable or clutch lever failure.

Undo the three screws retaining the drive cover and remove the housing.

Disconnect the cable from the actuator arm and remove it from the housing.  The actuator arm can be removed by rotating, and gently pulling on the lever to release it from the retaining pin in the housing.

Now offer the chain drive cover up to its mounting position and check that it sits comfortably against its mating face. (see image right)

It is likely that the housing sits proud by a millimeter or two. If so, the clutch pin should be shortened to allow the housing to sit flush in place.

Note: This is a critical part of the clutch setup. If the bar is too long, the clutch binds and the lever action is very heavy. If the bar is too short, then the control lever cannot disengage the clutch properly. 

On most motors, if the pin protrudes between 10mm & 11mm (see image right) the clutch disengaging/engaging action usually works correctly. Grinding the end of the clutch pin is the best way to shorten it.

Reassemble the actuator arm into the housing and offer the housing up to the motor. The lever should swing  freely through 90°. If there is any binding, or the housing will not sit flush on the mounting pad, remove the clutch pin and shorten it until the actuator arm swings freely. 

You should be able to operate the clutch by hand at the actuator arm.  There should be little movement between engaged and disengaged positions (about 10mm at the end of the actuator arm. If it is much more than this, then the clutch pin is probably a little short).

Removing the chain drive cover

Chain drive cover with actuator arm removed

Remove the chain drive cover to access the clutch pin

Clutch pin protruding from the chain drive sprocket

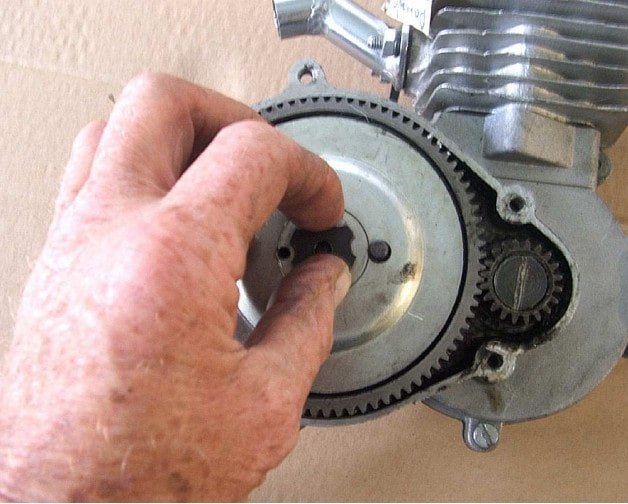
Chain drive cover removed from the bicycle motor

The clutch pin protrudes from the center of the chain drive sprocket

3. Setting the motorized bike clutch lever and cable tension

Clutch cable position

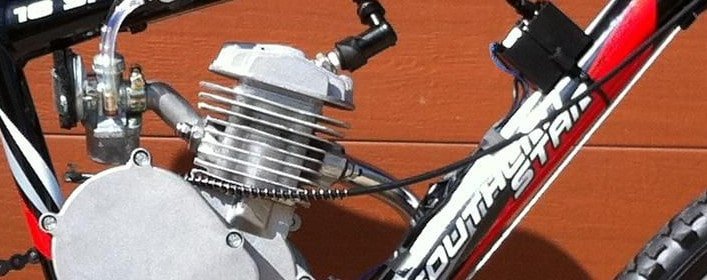
Clutch cable on motorized bicycle

Note: An excessively long clutch cable with too many curves in it can cause trouble. The cable should be shortened to the correct length.
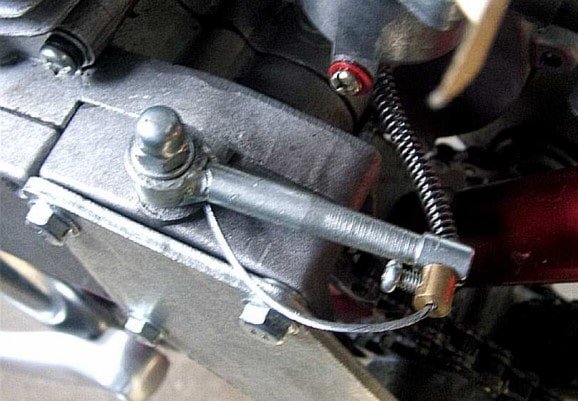
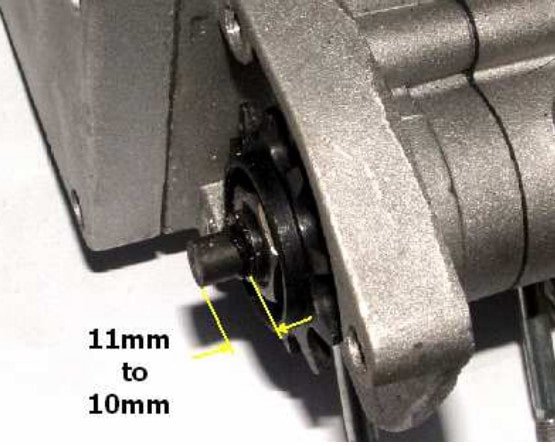
The clutch lever action at the handlebars should be no heavier than pulling on a brake lever. If the  clutch lever on your motorized bike is heavy to pull, then the assembly is not going to work correctly for very long. 

Usually the first item to fail will be the clutch cable.  The cable breaks because it cannot handle the excessive load. 

Disconnect the clutch cable from the clutch actuation lever and check for broken strands on the inner cable. If the inner cable is frayed, it can snag against the outer sheath and lock.

Check the outer sheath for lumps or kinks. If either is damaged, replace the cable.

BB Motorized Bikes

Shorten the clutch cable

Shorten the clutch cable of your bicycle motor so there are a minimum of twists and turns.  At the same time, you need to make sure that there will be no kinks in the clutch cable of your motorized bicycle when the handle bar is turned fully either way.

  • To shorten the clutch cable, remove the Inner cable about half way, and then cut the outer sheath to the correct length. 


  • Cut the outer cable about 50mm from the cable lock and fit a cable end protector (available from your local bicycle store). Slide the Inner back into its original position (some light oil wiped on the Inner cable is a good idea) 

Note: Use sewing machine oil or bicycle chain oil to lubricate the clutch cable. WD 40 and similar penetrating oils are not recommended for this task. Penetrating oils react with the grease and material inside the cable sheath causing sticking and jerky action. 

  • Fit the Large diameter Spring (about 9mm) over the outer cable and thread the inner cable through the outer cable protector.
  • Fit the small compression spring over the inner cable and thread cable through hole in the actuating lever. 
  • Check that the clutch lever on the handlebars is in the engaged position (with the clutch lever released) and ensure the outer cable is seated correctly at both ends. The cable adjuster at the clutch lever should also be screwed in all the way.
Fitting the clutch actuator arm

Clutch actuator arm

Clutch cable fitted to the atuator arm of the bicycle motor.

  • Pull the inner cable by hand so there is no slack.  With the actuator arm resting against the clutch pin, tighten the clamping screw (Some motorized bicycle clutches have a different locking screw mechanism – If required, fit the cable lock and tighten the clamping screw).

4 Finishing the job

At this stage, it is time to test ride the bike. 


Note: Do not fully tighten the screws on the clutch side cover until this test is completed (The right hand side of your motorized bicycle engine), as you may still want to make some final adjustments. 


Take the bike for a ride and make sure the clutch is working correctly. If necessary, make any 

adjustments required. 


When satisfied all is OK, add grease to the gears and tighten the screws on the clutch side 

cover (Use general purpose or lithium based grease). The only adjustment required now should 

be the occasional cable tension adjustment from the clutch lever of the handlebars. 

Cleaning the pressure plate and clutch pads on a bicycle motor

Oil and/or grease can cause the clutch to slip. This can be corrected by removing the Pressure 

and clutch plates, washing them, and the clutch pads, in methylated spirits and drying them with a clean cloth. 


The pads can be removed so the back of the clutch plate can also be cleaned. There are three 

small holes in the back of the clutch plate which are intended for the application of light oil to 

lubricate the small bearings that support the clutch plate. When thoroughly dry, reassemble the 

mechanism and re-set as above.

Conclusion

Fixing a motorized bicycle clutch problem can be a challenge if you do not know how the system works.  


Once you know how the parts interact it is easier to repair any faults.  Our step by step clutch setup guide makes it easy to understand what to do, what to check, and how to avoid problems.


When you have set the clutch properly, your motorized bicycle will give you years of good service.  After setup, your motorized bicycle clutch can be adjusted in a few seconds using the cable tension adjuster on the clutch lever.


For additional clutch fitting tips click here.

Motorized Bikes
How to fix motorized bike clutch problems
Power Bicycles
How to fix motorized bike clutch problems
Information about motorized bikes
Is your motorized bicycle clutch not engaging or is it locked completely? This definitive guide to fixing bicycle motor clutch problems wish step you though every aspect of clutch adjustment and repair.
Steve
Power Bicycle
Power Bicycle
http://power-bicycle.com/wp-content/uploads/2023/03/skull-logo-300.webp